Deploying TCP/IP printers with a Powershell GUI
TCP/IP printers in the remote offices
1 CURRENT SITUATION
At the moment of writing this, each DESKTOP has its own USB-printer. When person X for whatever reason disconnects the USB-printer and re-plugs it into a different USB-port, we have a problem.
Windows then sees it as a new device, it installs it on a new virtual USB-port, e.g. USB001 becomes USB002 and so on. Adding to that, a basic user has insufficient rights to install a printer (driver or device). So each time this happens, the IT-staff has a time-consuming job on their hands.
IT has to remove the old device, and more often than not, this includes cleaning up the registry. The internal software that we use, requieres a specific naming convention. So the “new” printer installation has to be named exactly the same as the previous installation. Sometimes leftovers in the registry can cause problems.
When this problem occurs, colleague’s at the remote offices can’t do their job and custumors have to wait and be patient.
2 DESIRED SITUATION
It was decided that each DESKTOP in our remote-offices will be replaced by a LAPTOP. Each co-worker will have his/her own laptop and carry it with them. A co-worker has a one-to-many relationship with offices and printers. One co-worker can sit in any remote office and at any desk in that office.
No longer will we use USB-printers but will we install TCP/IP based printers. These printers will not be installed on a printserver but computers will directly print to them.
The reasons as to why we won’t install them on a printserver are as follows:
- Manageability Each printer has to be installed at least 3 times (6 at the most) (printer, printer lowertray, printer fronttray). Knowing that we’ll have about 80 printers, multiplied by 3, would mean that we’ll have 240 printers (+others) on the printserver.
- SPOF (Single point of failure) If for whatever reason, the printserver would go down, the impact on the remote offices would be huge. Printing is of the outmost importance to them.
- Bandwith and networktraffic Sending each printjob back and forth would cause a lot more networktraffic.
3 CONCEPTUAL OUTLINES
3.1 Naming convention
3.1.1 Printernames
When deciding on this, there were two possibilities;
A) Keep the current naming convention
- Loketprinter
- Loketprinter LowerTray
- Loketprinter FrontTray
B) Name them by location and office description (+ needed internal suffix)
The printername will be made up by two parameters:
- Location (e.g Diest,NYC,Washington DC, Florida, …)
- Desk (e.g Loket1)
Example of printername:
- DiestLoket1
- DiestLoket1 LowerTray
- DiestLoket1 FrontTray
We went for option B. This has the advantage that a user can add as many printers as they want. Option A would make is nessecary to always delete the existing printer before we could install the new one. Users would have to repeat this action each time they switched location or desk. Not only would it require more time and effort by the end-user, but it would also increase the chances of something going wrong.
One disadvantage of option B is that when a printer gets replaced AND gets a new IP-address (unlikely), all users that have the printer already installed, would print to a faulty IP/printer. This is why we have rules in place (see below).
3.1.2 Portnames
The TCP/IP-port will have the same name as its printer e.g. DiestLoket1 (with ip x.x.x.x). This way it’s always clear what port belongs to which printer.
3.2 IP-assignments
Each remote office has its own IP-range that is made up as follows:
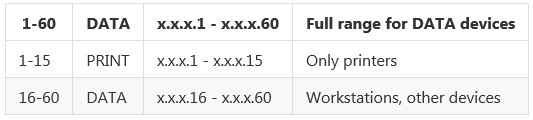
At each remote office, the first 15 Ip-adressess of that range will be used for printers. We will be working with what’s called “Lease reservations”, also known as “DHCP\IP reservations”. On the DHCP-server each printer will get an IP assigned to it based on it’s MAC-address. By doing so, you’ll always have a visual overview of what IP adresses that are “statically” assigned. The upside is that you don’t have to assign the IP-address to the client. (In this case, you don’t have to input the IP address into the printer).
3.3 Labels
Each printer will get a label that has the following information on it:
- MAC address of the printer
- IP-address
- Printername
The label should make it easier for the end-user to identify at which printer they are sitting at. This way, the end-user can easily identify which printer he/she needs to add via the GUI. The names that are found on the label, will be the same as in the GUI.
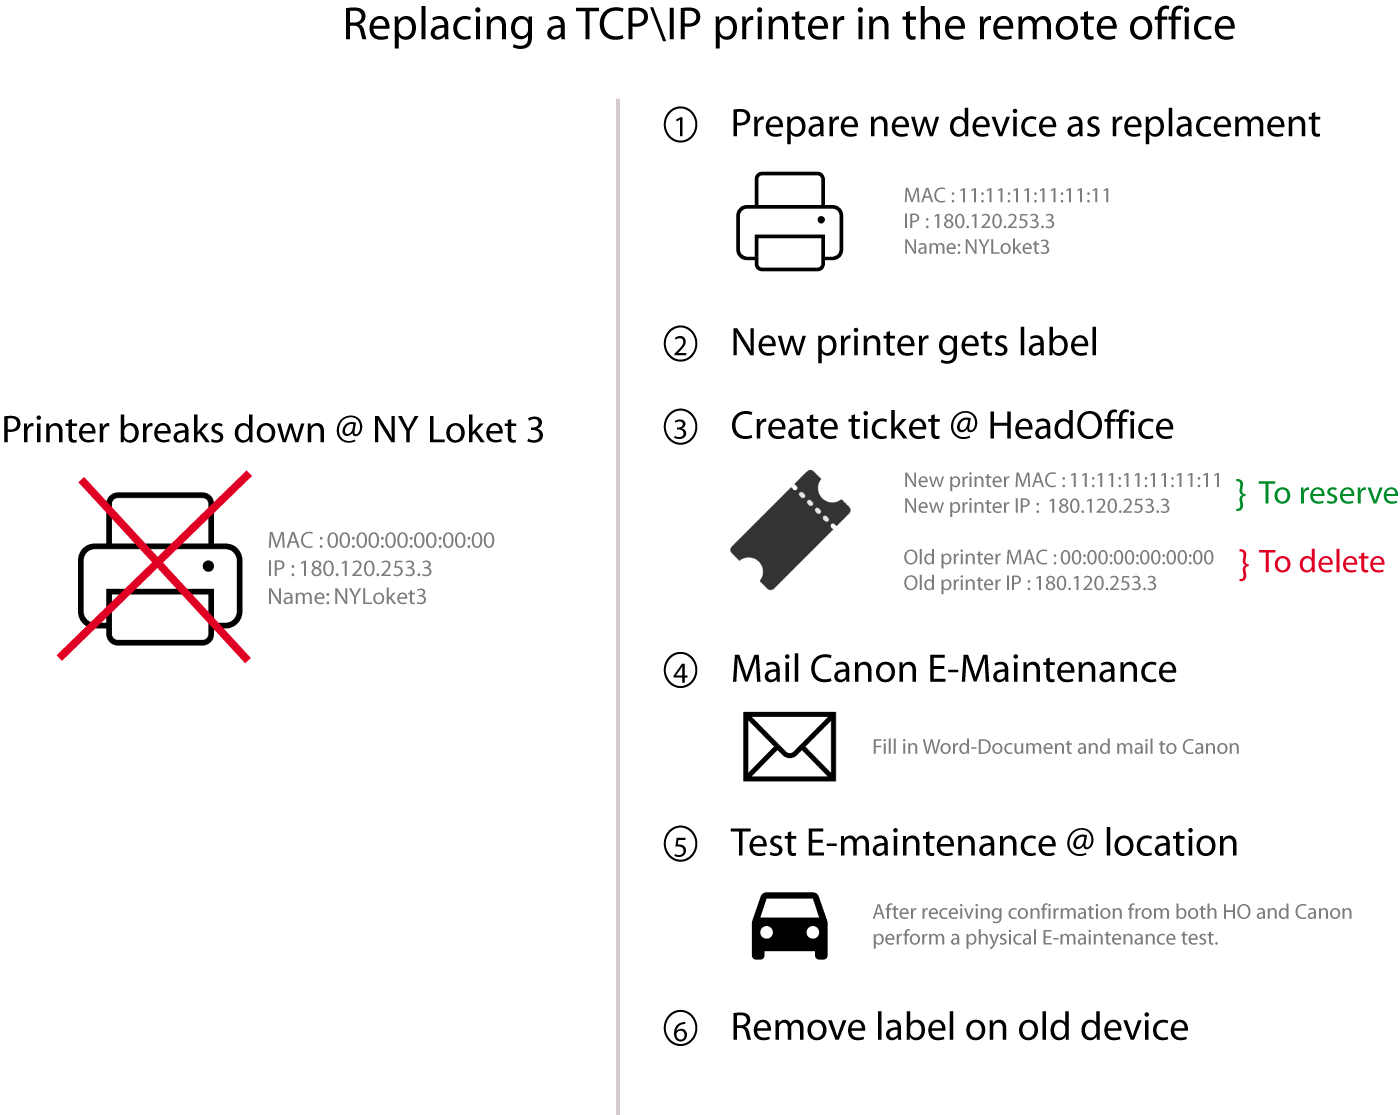
When a printer needs replacement, all the IT-staff would need is the printername.
They can then, look up the IP in the sourcefile and use that IP to prepare the new device.
This new device would then get the name (and label) of the broken printer.
The old device would now be obsolete and can be “scrubbed” after repair or “thrown away”. (see “Replacing a TCP\IP printer in the remote office”)
4 RULES
In order for this to work, there are some basic rules that need to be followed.
- When a printer gets replaced, its replacement has to get the same IP-address, printername and label. There can be no exception!
- There can only be one source where the inventory of the printers will be stored at. This sourcefile will serve as the database for our GUI-solution.
DEVELOPING THE GUI - INSTALL LOKETPRINTER V1.0
1 PREREQUISITES
The GUI was created with Powershell Studio 2017. The entire tool relies on the presence of Powershell v5 as it uses its modules. This means that this tool will not work on Windows 7 (well, in our enterprise anyway). The tool will be used for all Windows 10 installments.
The tool uses a few files that are located on a networklocation to which the user has access to. (See “3.5 Making the tool flexible for more details”)
2 TECHNICAL QUESTIONS
During the development of this tool, i encoutered some questions that needed to be answered.
- Can a plain user add a TCP/IP port?
- Yes
- Can a plain user install a printer based on that TCP/IP port?
- Yes
- Can a plain-user install printdrivers themselves ?
- Yes
After testing it became clear that a user can indeed install printdrivers when its with a GUID of 4d36e979-e325-11ce-bfc1-08002be10318. This is done by Group Policy, more information can be found over at:
- Will we install individual drivers per printertype or one Generic driver?
- We chose to install the Generic Canon printer driver
- We chose to install the Generic Canon printer driver
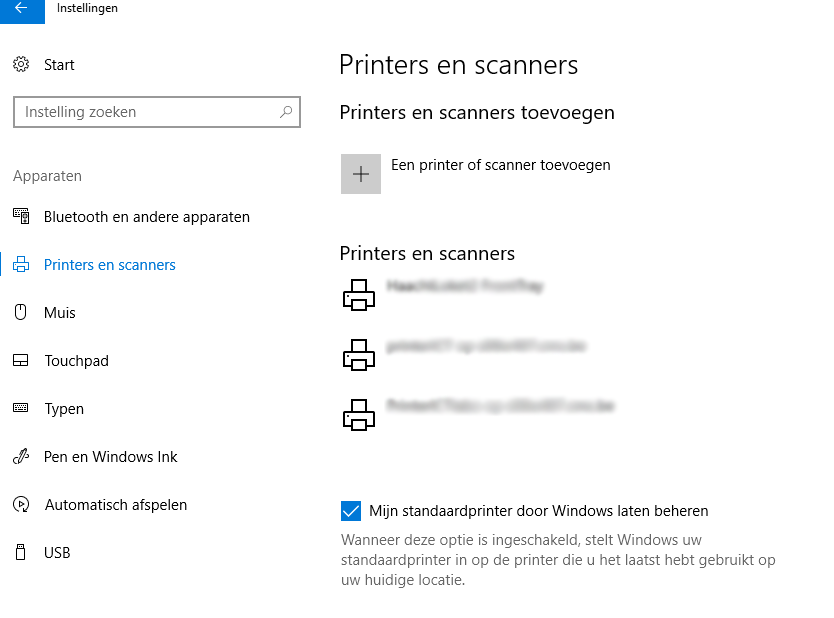
- Can a default user manage his/her default printer?
- Yes, but we need a GPO for this
With the current OS-image comes the setting that Windows manages your default printer. Users can disable this via the control panel. There is also the possibility via GPO, this is currently implemented as a test. The tool works fine even without the setting changed. Users would just have to set their default-printer themselves.
3 ISSUES ALONG THE WAY
During the creation of the GUI, i came across a few question/problems that i’ll explain here.
3.1 Removing TCP/IP port sometimes won’t work
One problem that might occur, is that a user is not able to remove a TCP/IP printport. Nine out of ten times this works fine, but for some reason, it sometimes doesn’t. This only becomes an issue when the IP address of a printer would change (and thus the TCP/IP port needs to be adjusted with the new IP). Although this won’t be an issue very often (because a printer would mainly be keeping its IP), we still need to catch that. This could be a problem when, for instance, print ranges change in the far future.
The only way to fix that, is to restart the printspooler. By default a default-user doesn’t have sufficient permissions to restart the spooler service.
This can be remedied one of two ways.
1) You prompt the user to reboot the machine (so by restarting the pc, you restart the service) 2) You give the user sufficient rights to start/stop that specific service.
Option 1 is quite intrusive for the end-user whereas option 2 is completely transparant.
3.1.1 Question was, is this safe to do?
- Are there any dangers in allowing them to do so?
- What are the dependant services of the printspool service?
- Are they important?
- Are they important for other processes?
- How do they work?
The printspooler has one dependant service named LPDSVC. It uses the LPD-protocol that runs on UDP and TCP port 515. This is defined as a well known port by Microsoft. More information can be found over at :
- https://technet.microsoft.com/en-us/library/cc959828.aspx
- https://technet.microsoft.com/nl-nl/library/cc783789(v=ws.10).aspx
I didn’t find any resource where this was being (ab)used for malicious purposes. So i concluded that this was a safe option.
I created a GPO that allows for the stop and start of the printspooler by a default-user.
- http://www.itprotoday.com/security/edit-permissions-subinacl
- https://ss64.com/nt/subinacl.html
- http://www.waynezim.com/2010/02/how-to-set-permission-on-a-service-using-subinacl/
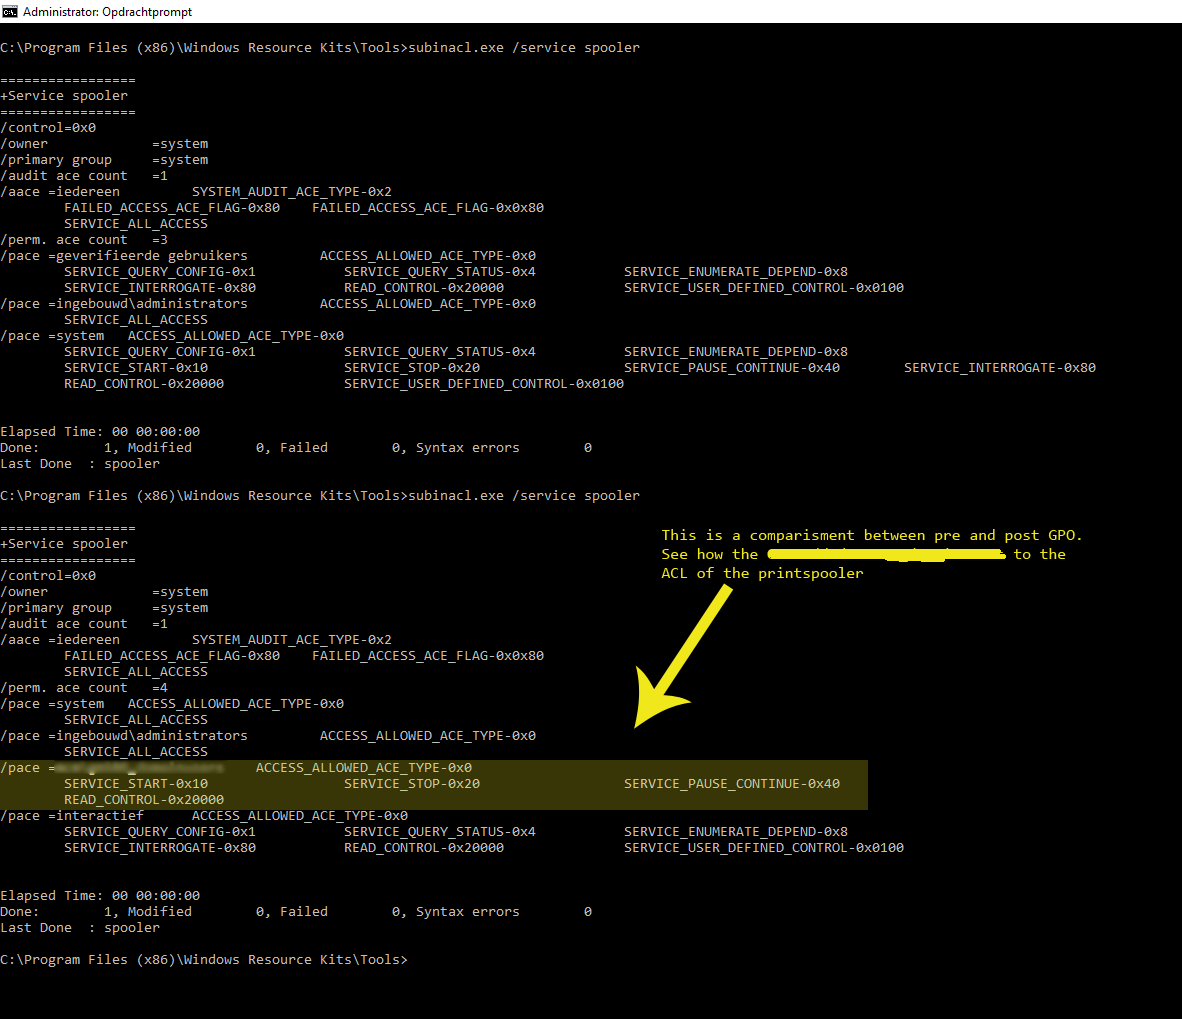
With a tool provided by Microsoft (subinacl.exe) you can see the ACL permissions set on a service.
After applying the GPO, the tool shows that our GM108_DomainUsers have access to restarting the Printspool service.

3.2 Removing a printer added by another user
The second problem was when a user adds a printer, it also add’s itself as the “creator” into the ACL-list of that printer-object. Now although Administrators will always have permissions to remove a printer, this isn’t the case for default users.
This becomes a problem when for instance, a user leaves the organisation and the laptop gets handed off to a new employee.
As with a USB-printer, the installation of a TCP/IP printer is visible for each user that logs onto that computer.
The new user however, can’t delete the printer installed by its predecessor.
To get around this issue, we add our own ACL-settings.
After adding them, the ACL-list looks as follows:

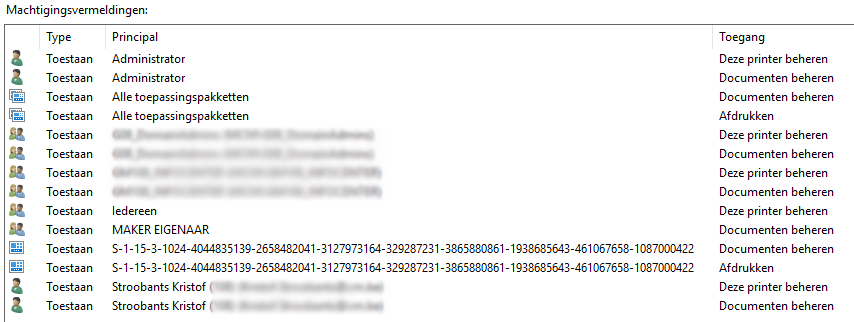
With these settings, each user on that machine is capable of deleting the printer that has this ACL-list.
Since “Iedereen/Everyone” is a LOCAL user, this only applies to that specific computer. A user doens’t have access to a TCP/IP printer that’s on a different machine (unless he/she installed it).
Even if that were to be the case, they wouldn’t be able to reach them as Windows 10 no longer shows print-devices when a user browses to \\laptop\c$. And even if it did show them that option, a default user can’t browse to c$.
Another route that a (malicious or clumbsy) user might try to take is the printmanagement.MSC console, but this is also blocked for non-admin users.
So there is no risk involved with importing this custom ACL-list.
For some reason the following SID get’s added during the installation although it’s not in my pre-populated ACL-list. S-1-15-3-1024-4044835139-2658482041-3127973164-329287231-3865880861-1938685643-461067658-1087000422 Windows adds this SID regardless of the fact that i import my own ACL list. Why? That’s not clear.
The best information i’ve found on this topic is over at :
3.3 Importing printpreferences
Our internal software requires that printer “DiestLoket1 Lowertray” prints on the second printtray. It has a few more requirements. For this reason, whenever IT installs a USB-printer, it sets the default printpreferences so that users don’t have to set them themselves.
When installing the printer via the tool, it automatically imports the printpreferences that are stored in XML-files.
It makes sure that
- DiestLoket1
- Prints non-duplex
- Prints on the manual tray
- DiestLoket1 LowerTray
- Prints non-duplex
- Prints on the second tray
- DiestLoket1 FrontTray
- Prints non-duplex
- Prints on the manual tray

3.4 Desciding on the printdriver
We chose to install the printers with the generic driver provided by Canon. This makes administration and keeping track of printer models less of a hasle. The driver sits, a long with the printpreferences, the ACL-list etc, on a networkshare to which the user has access to. From there, the GUI can download and install it.
3.5 Making the tool flexible
So the idea is that, in the future, other federations might benefit from a tool like this. Therefore i wanted to created the tool in such a way that it can be easily adopted.
In the code, there is only one hardcoded reference:
$parameterlist = Import-Csv "\\server\printers\TCPPrinter\parameters.csv" -Delimiter ";"
When a federation want to use the GUI, the only piece of code they need to adjust, it the location of the parameterlist.
Then, compile a new EXE and they are good to go.
In the parameters.csv you’ll find the following parameters:
parameter;value
federation;CM Leuven
networkpath;\\server\printers\TCPPrinter
database;db.csv
icon;\\server\printers\TCPPrinter\cm.png
The federationparameter serves as the root-node in the GUI. These parameters can easily be adjusted per federation. At the same location as the parametersfile, you’ll find all resources that are being used by the GUI.

3.6 Toast notification
I first started out with an old method , the balloon notification. The process wasn’t as smooth and goodlooking as i wanted it to be.
The biggest issue was the icon that was being displayed way too small.
#Load the required assemblies
[void][System.Reflection.Assembly]::LoadWithPartialName("System.Windows.Forms")
#Remove any registered events related to notifications
Remove-Event BalloonClicked_event -ea SilentlyContinue
Unregister-Event -SourceIdentifier BalloonClicked_event -ea silentlycontinue
Remove-Event BalloonClosed_event -ea SilentlyContinue
Unregister-Event -SourceIdentifier BalloonClosed_event -ea silentlycontinue
Remove-Event Disposed -ea SilentlyContinue
Unregister-Event -SourceIdentifier Disposed -ea silentlycontinue

#Create the notification object
$notification = New-Object System.Windows.Forms.NotifyIcon
#Define various parts of the notification
$notification.Icon = $($parameters.icon)
$notification.BalloonTipTitle = "$($parameters.Federation) - Installation $printer"
$title = "Installtion completed."
$notification.BalloonTipText = $title
#Make balloon tip visible when called
$notification.Visible = $True
$notification.ShowBalloonTip(50000)
#$notification.Dispose()
So i searched the internet and stumbled upon Toast notifications. I found a sample code over at deploywindows.com
From there i adjusted the code and made it to be the following
# https://deploywindows.com/2018/01/15/want-to-become-a-windows-10-toast-balloon-expert-with-or-without-microsoft-intune/
# Toast overview: https://msdn.microsoft.com/en-us/library/windows/apps/hh779727.aspx
# Toasts templates: https://msdn.microsoft.com/en-us/library/windows/apps/hh761494.aspx
# https://docs.microsoft.com/en-us/windows/uwp/design/shell/tiles-and-notifications/adaptive-interactive-toasts
# https://gist.github.com/altrive/72594b8427b2fff16431 --> see comment by guillaume86 commented on 5 Feb
# https://gist.github.com/Windos/9aa6a684ac583e0d38a8fa68196bc2dc

FUNCTION ShowToast
{
	$ToastTitle = "$($parameters.Federation) - Installation $($printer)"
	$ToastText = "Installation finished"
	$Image = "$($env:TEMP)\cm.png"
	[string]$ToastDuration = "short"

	# copy icon to local temp of user
	Copy-Item $parameters.icon -Destination $($env:TEMP) -Force

	[Windows.UI.Notifications.ToastNotificationManager, Windows.UI.Notifications, ContentType = WindowsRuntime] | Out-Null
	# Define Toast template, w/wo image
	$ToastTemplate = [Windows.UI.Notifications.ToastTemplateType]::ToastImageAndText02
	IF ($Image.Length -le 0) { $ToastTemplate = [Windows.UI.Notifications.ToastTemplateType]::ToastText02 }

	$imglocal = $Image

	# Define the toast template and create variable for XML manipulation
	# Customize the toast title, text, image and duration
	$toastXml = [xml]$([Windows.UI.Notifications.ToastNotificationManager]::GetTemplateContent($ToastTemplate)).GetXml()
	$toastXml.GetElementsByTagName("text")[0].AppendChild($toastXml.CreateTextNode($ToastTitle)) | Out-Null
	$toastXml.GetElementsByTagName("text")[1].AppendChild($toastXml.CreateTextNode($ToastText)) | Out-Null

	IF ($Image.Length -ge 1) { $toastXml.GetElementsByTagName("image")[0].SetAttribute("src", $imglocal) }
	$toastXml.toast.SetAttribute("duration", $ToastDuration)

	# Convert back to WinRT type
	$xml = New-Object Windows.Data.Xml.Dom.XmlDocument; $xml.LoadXml($toastXml.OuterXml);
	$toast = [Windows.UI.Notifications.ToastNotification]::new($xml)
	$AppID = "$($parameters.appid)"

	# Create and show the toast, dont forget AppId
	[Windows.UI.Notifications.ToastNotificationManager]::CreateToastNotifier($AppID).Show($Toast)
}
ShowToast
This function worked on
OS Version: 10.0.15063 N/A Build 15063
but it does not work on
OS Version: 10.0.16299 N/A Build 16299
The reason for that is the following piece of code:
$AppID = "$($parameters.appid)"
I named the AppID as i wanted it to be “CM Leuven - Loketprinter v1.0”. This would make it more recognizable for the end user, as it would be clear what application is showing them the notification.

In Windows settings\notification this application name would then show up on Build 15063.
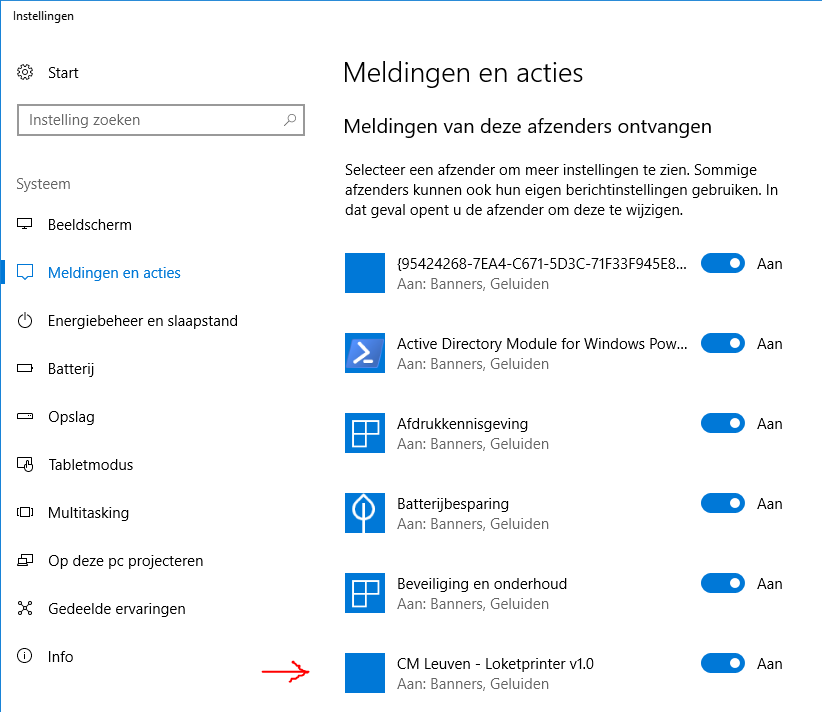
In Build 16299 however, this is no longer the case.
I came across this problem at Stackoverflow and it seems to be a known issue. From there i made my way over to the official Microsoft Documentation.
You can use the start-apps by Microsoft as the “provider” for your notification.
Get-StartApps | select * | Sort-Object name
You just have to select the path and choose that as the AppID, i chose to use Control Panel as the “provider”. I also reformatted the code and used a different, more reablable way of building the XML for the toast notification.
$app = 'Microsoft.Windows.ControlPanel'
FUNCTION ShowToast
{
    $Image = "$($env:TEMP)\cm.png"
    $app = 'Microsoft.Windows.ControlPanel'
    [Windows.UI.Notifications.ToastNotificationManager, Windows.UI.Notifications, ContentType = WindowsRuntime]

    $Template = [Windows.UI.Notifications.ToastTemplateType]::ToastImageAndText01
    $ToastTitle = "$($parameters.Federation) - Installation $($printer)"

    #Gets the Template XML so we can manipulate the values
    [xml]$ToastTemplate = ([Windows.UI.Notifications.ToastNotificationManager]::GetTemplateContent($Template).GetXml())

    [xml]$ToastTemplate = @"
        <toast launch="app-defined-string">
          <visual>
            <binding template="ToastGeneric">
              <text>$($parameters.Federation) - Installation $($printer)</text>
              <text>Installation finished</text>
              <image placement="appLogoOverride" src="$($env:TEMP)\cm.png"/>
            </binding>
          </visual>
        </toast>
"@

    $ToastXml = New-Object -TypeName Windows.Data.Xml.Dom.XmlDocument
    $ToastXml.LoadXml($ToastTemplate.OuterXml)
    $notify = [Windows.UI.Notifications.ToastNotificationManager]::CreateToastNotifier($app)

    $notify.Show($ToastXml)
}
ShowToast
This is what it looks like now on both versions of the OS.

4 USING THE GUI

I kept the GUI as simple as possible.
When you open the tool, it will read the contents of the CSV-file and generate a clickable list.
All printers will be sorted per location.
You can just open the location where you are currently at and you will see the available printers.
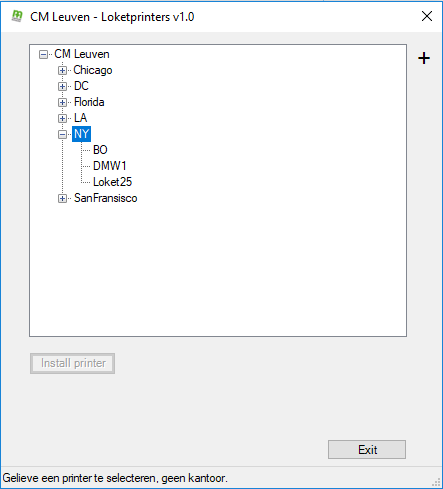
The names of the printers are the same names that you’ll find on the physical label on the printer you are currently sitting at. The “Install printer” button will only be available when you have selected a printer. Otherwise you’ll get a discrete notification that you need to select a printer rather than a location.
Once you have clicked the install-button, you can’t cancel it. A progressbar will be displayed and it will tell you what’s going on.
When the installation has completed, it will automatically bring you to the “Printer and devices” control panel.
This is just for reassuring the user that everything went well.
Here they can verify the newly installed printer as being their new default printing device.
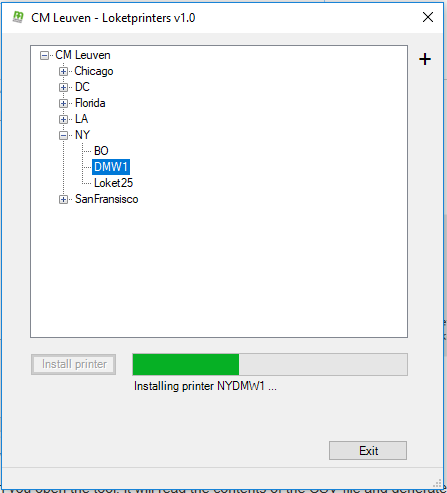
When the installation is finished, a notification is pushed to the screen.
IT-STAFF GUIDELINES
Below you’ll find information that is designed for the IT-staff.
1 PROCEDURE: ADDING A NEW PRINTER
When we have to deploy a new printer, no developer needs to be engaged to add it to the GUI. Just by adding the values into the GUI the printer will be available for the end-user.

2 PROCEDURE: REPLACING A PRINTER
3 DEBUGGING A PRINTER INSTALLATION
During the installation, for each step the GUI goes through, a logentry is made. The log is kept on the local disk and looks as follows:
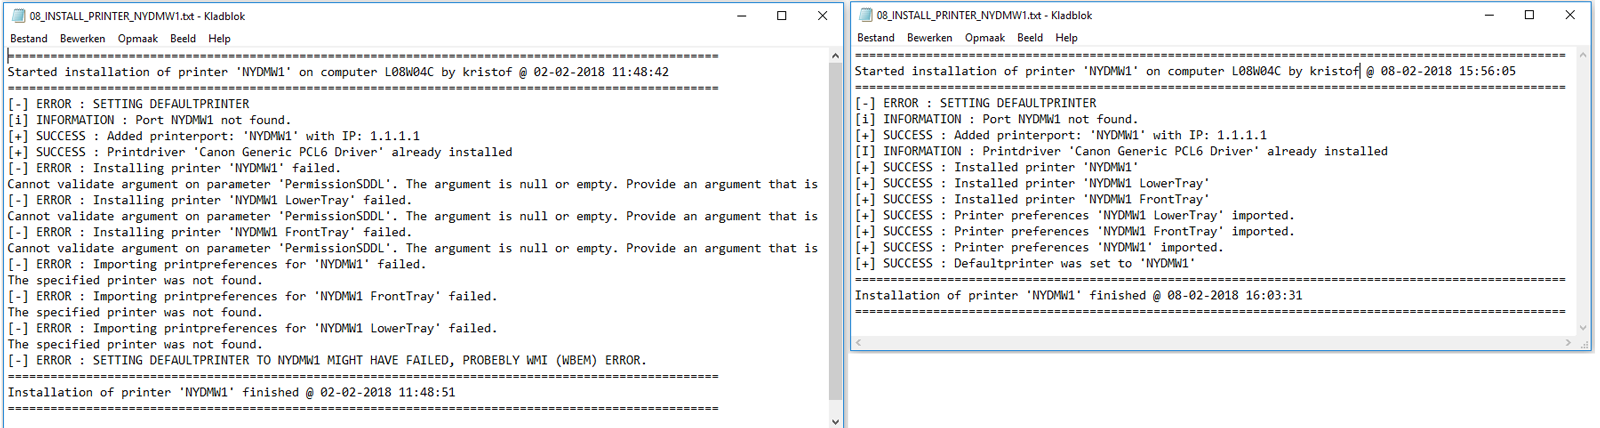
On the local machine, you can easily access them via the environment variable : %appdata%\PrinterLogs or going to that pad remotely : \\computer\c$\Users\username\AppData\Roaming\PrinterLogs. For each process/step it will tell you if it was a succes or not. If it failed, it will catch the Powershell-error and write it down. This should hint you towards the problem.
TL;DR (Too Long , Didn’t Read)
IT staff can add a printer to the GUI just by adding the four values into the CSV-file. Users can install a TCP/IP printer based off of that file without having Admininistrator permissions.
Leave a Comment