ODBC 64-bit auto deployment (staging)
On the Windows 7 64-bit operating systems, the DataSource (ODBC) is not created through our normal GPO (XY_CMP_ODBC). In fact it throws us an error:

Searching the internet it became clear it is harder to add these sources through GPO on a 64- bit platform.
Road to discovery
During my search i came across the following article:
32-bit ODBC System DSN on 64-bit Windows usiMng Group Policy Client Preferences I searched around and found two different approaches to creating 32-bit System DSN’s on a 64-bit box. One was using powershell to load registry keys, the other used GPO Client Side Preferences to define User DSN’s which creates the 64-bit DSN and a 32-bit equivalent. The thing is, I actually prefer using GPO’s for settings instead of scripting them. Also, I want to be able to update DSN’s without having users logging off and back on. For simplicity I create and test the 32-bit System DSN on the 64-bit box using the 32-bit ODBC Admin, % systemroot%\SysWOW64\odbcad32.exe. Then I load up the GPMC, create or edit my policy and go to Computer Settings Preferences Registry. Right Click on Registry and create a New Collection Item. If you use this GPO to create only System DSN registry keys you can simply type in a logical name for the DSN. In my case, I named my collection 32-bit System DSN’s because I have several other registry entries in my GPO. Right-click on your newly created Collection Item, and select New Registry Wizard. Assuming you manually created the 32-bit DSN on the same box as you are running the GPMC, simply click Next. Now go to HKLM Software Wow6432Node ODBC ODBC.INI Here you should find any 32-bit System DSN’s you have created. Click the one you want to create using the GPO and select all the settings within the selected key. Click Finish. Now you will have a new Collection Item, “Registry Wizard Values” within the one you created (the one I named “32-bit System DSN’s”) . You should rename this to something that makes sense to you. Now, all you need to do, is apply this GPO to all 64-bit servers or client computers that require the 32-bit System DSN.
Further detailed info on how to deploy a registry collection can be found here:https://blog.thesysadmins.co.uk/group-policy-preferences-1-deploying-registrysettings.html
So based on the explanation above you can potentially “import” registry keys (or a collection of keys) via GPO. After testing this i concluded that this did not work. Either it did not import the keys or it did so on a different location than intended.
I strayed away from this option and looked into the possibility of creating a regfile that contains all keys (taken from a reference computer) and insert them that way. A manual test concluded that this should work. Therefore i looked for a way to automate this.
We could create a logonscript and run this command BUT there would be a problem. This would be running each time a user logs on. Since we want to have boot/logon experience that is as fast as possible, this wasn’t an option.
Continuing the search, i got the idea to create a scheduled task which would run only once and then do a self-delete. The idea was to create a scheduled task via the GUI (also doable by GPO). I try to stick with GPO as much as i can, since windows favors this in the way of handling things (mostly speed-wise).
The problem with the GUI is that you can only get the self-delete and run-once task to work is if you have a planned task based on time not on an event. So if you were to create a task with an event as the trigger (for instance, one minute after logon so that it does not impact performance), you can’t make it run only once nor can you self-delete it.
Yet another problem is that the planned task date/time should be variable, depending on the date the staging happened. So doing this pre-stage and having the option to running it only once isn’t an option via GUI.
Although schedtask GUI might not work (not on client via export into XML nor via a schedtask created with GPO), we still have a possibility with schtasks.exe in combination with regedit.exe. So moving on to the schtasks.exe we can create a task via the following command:
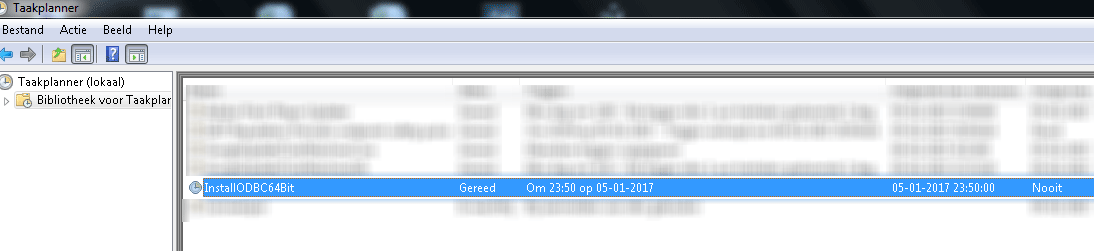
schtasks.exe /ru "SYSTEM" /Create /SC ONCE /ST "23:50" /TN "InstallODBC64Bit" /TR "regedit.exe /s \\server\sysvol\domain\SCRIPTS\108\Scripts\Users\Logon \ODBC64BIT.reg" /v1 /z
Now this will create a task named InstallODBC64Bit, it will be run as SYSTEM and is planned at 23:50 on the day the first person logs on. This should negate almost all possible conflicts. (This is based on the fact of how we work at CM Leuven. After a OS-image staging is done, one of the two administrators always logs on with his personal account to check if all is OK. )
The next problem was that this command needs to run only one time, so that the task will be created ONCE. After creation, the task needs to sit there until it’s time to run, afterwards it will self-delete (hence the /Z).
To get this done, we’ll be using a registry key named “RunOnce”. This is designed to run a program once, the next time a computer boots.
Now the following arcticle fount on MSDN states:
Run and RunOnce keys are run each time a new user logs in. RunServices and RunServicesOnce are run in the background when the logon dialog box first appears or at this stage of the boot process if there is no logon.
Reference : https://msdn.microsoft.com/en-us/library/windows/desktop/aa376977(v=vs.85).aspx
The text marked in yellow makes it obvious as to why we don’t immediately run the command:
"regedit.exe /s \SCRIPTS\108\Scripts\Users\Logon \ODBC64BIT.reg"
In the RunOnce registry key but why we have to create a schedtask. As the Runservices are being called before the user logon, the script has no “user context”, hence, the schtask.exe wouldn’t have access to the map on the domain controller. Or at least, we can’t be certain it will have access.
Since all users have read access to the files on the DC, we create a scheduled task that is run in user context. So we create a reg-value named InstallODBC64Bit via GPO and only deploy it once.
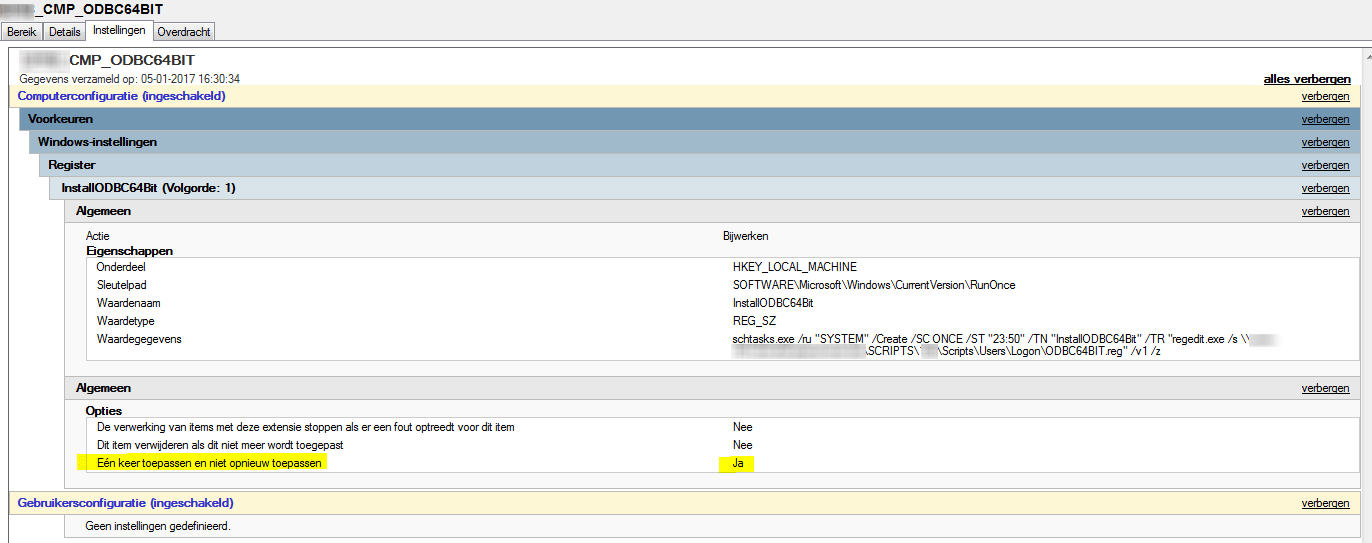
This creates our “runonce” regkey, who then during logon will created the needed schedtask that will only be run once at 23:50 after which it will be deleted.

By doing so we still deploy our configuration via GPO and the installation will only be performed one time. Next step is to assign an AD computer collection to the GPO where all new 64-bit computer will end up. In theory we could just deploy this to the authenticated user (aka all machines and users). The reg-file makes the following KEY: [HKEY_LOCAL_MACHINE\SOFTWARE\Wow6432Node\ODBC]
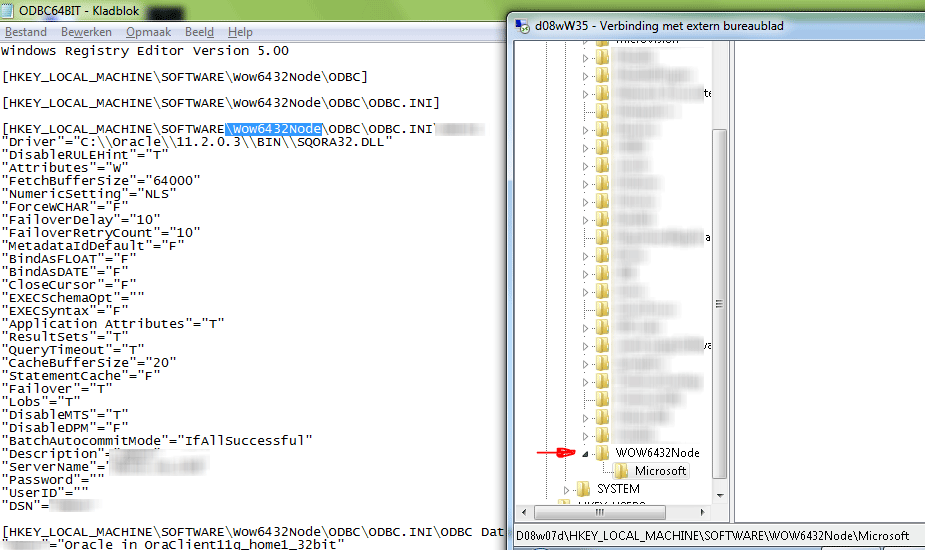
As seen on the screenshot above, the Wow6432Node key already exists on a 32-bit computer. There is no harm in deploying this GPO alongside the default 32-bit deployment. This is safe in both directions since the installation of a 32bit fails on a 64-bit but does no harm.
We could write a script that determines what reg-file to use, 32 or 64 bit . But since they do no harm AND with Windows 10 all being 64-bit, i will not be spending time on this.
UPDATE It was decided that it would be better to roll this out to only 64-bit computers. Therefor an AD computer collection was made. A script was written in Powershell that each day queries the SCCM collection and compares its members to the AD collection group. All new members will be added to the AD group automatically.
cls
import-module "C:\Program Files\Microsoft Configuration Manager\AdminConsole\bin\ConfigurationManager\ConfigurationManager.psd1"
Set-Location TOP:

$Membershiprules = $null
$ADGroupmember = $null
$SamAccountName = $null
$SCCMMembershiprules = $null
$date = Get-Date

# STEP 1 , get all current members of XY_OSD_W7_64_NL out of SCCM
$SCCMMembershiprules = Get-CMDeviceCollection -Name  "XY_OSD_W7_64_NL"  | Select-Object Name -ExpandProperty CollectionRules

# STEP 2 retrieve all current members out of AD-group XY_OSD_W7_64_NL
$ADGroupmember = Get-ADGroupMember XY_OSD_W7_64_NL -Server server1 | select Name, SamAccountName -ExpandProperty SamAccountName

# Go trough all members of SCCM Collection
foreach($SCCMCollectionMember in $SCCMMembershiprules){
       ""
       # if the SCCM-collectionmember is part of the members of the AD group, then do nothing
       if($SCCMCollectionMember.RuleName -in $ADGroupmember.Name){
            write-host $SCCMCollectionMember.RuleName "is already a member" -ForegroundColor red
       }else{
       #if the SCCM-collectionmember IS NOT A PART of the AD group, add it.
           $SamAccountName = $SCCMCollectionMember.RuleName+"$"
           write-host $SamAccountName "will be added to the AD-group" -ForegroundColor Green
           Add-ADGroupMember -Identity "XY_OSD_W7_64_NL" -Members $SamAccountName -Server server1 -ErrorAction SilentlyContinue
           Add-Content C:\SchedTasks\SyncSCCMwithAD\log.txt "$SamAccountName  $date" -Force
       }
}
The GPO was then linked to this AD computer collection group.
TL;DR We create a reg-key via GPO that during the first logon will create a schedtask that will be run once. After this schedtask has run, it will self-delete. The installation is then concluded.
Resources that were used :
Leave a Comment